Sunday, December 31, 2017

CAS-ual Fridays January Release - Day 1

Hello there!   Happy New Year's Eve to everyone!    Today begins the start of the January release for CAS-ual Fridays Stamps!   I know there are going to be a lot of thrilled crafters out there, because this release features a whole bunch of amazing coffee-themed goodies!
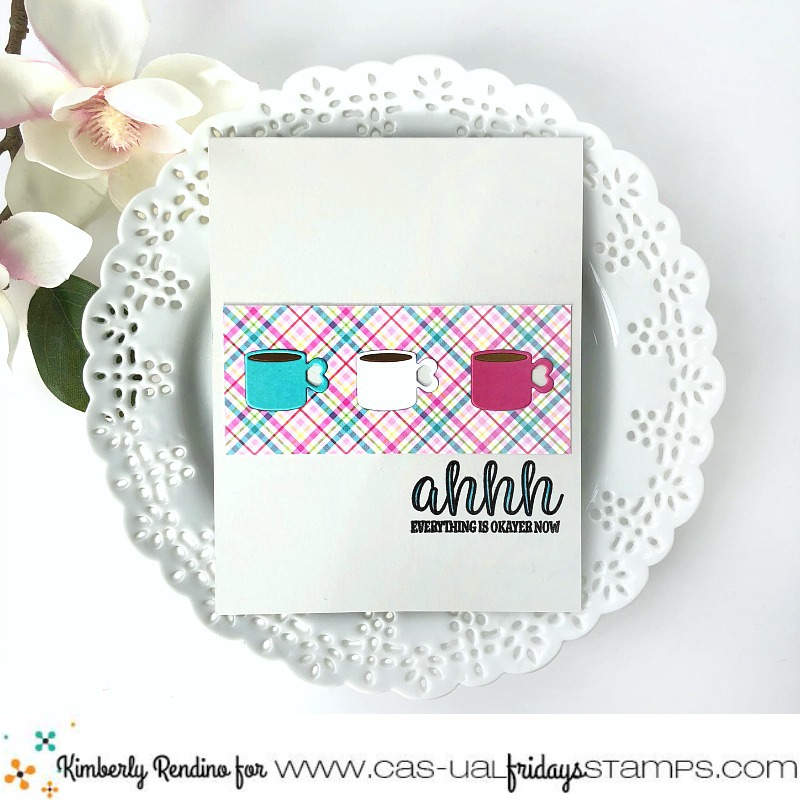
First up is the stamp set Cup of Coffee, along with the Coffee Cup Fri-Dies.   So many cute sentiments in this stamp set!!   Gah!  I die cut the coffee mugs from a strip of patterned paper and again from a few colors of solid cardstock.   I adhered the negative piece onto a pale grey card base, and adhered the coffee mugs back in place (die-cut inlay).   

The sentiment was stamped and heat embossed in black, and I added a touch of color with an aqua Copic marker.  Voila!    Clean and simple and.....coffee!   So everything is okayer now!   LOL!

Be sure to check back tomorrow for some more coffee goodness (and to see my favorite card of the release!)

When you hit the CFS shop, be sure to use the special code, KIMBERLYSENTME, to save 15%!!    Woo-hoo!!!

Saturday, December 30, 2017

Winnie & Walter Leading Lady - Take Five


Hello again!   I'm back for my final performance as Leading Lady - I can't tell you how exciting this month has been!  I've loved every minute of creating with my awesome winnie & walter goodies.  Thanks so much, Shay, for inviting me to create with your wonderful products!

I broke out one of my older winnie & walter favorites, The Party to create a simple New Year's card.   I stamped the streamers and party horns with Delicata gold & silver inks.   They pop on the black cardstock!  These inks stay wet for a bit, so I let them dry for a few minutes, then lightly brushed over everything, which left a fine dusting of sparkles over the entire card.   The sentiment, from In a Word: Merry, was heat embossed in silver and popped up on the card with foam tape.


A few scattered sequins finished off the panel, which was then adhered to some shiny gold paper I found in my stash!

I'd like to take a minute and wish everyone a very healthy and happy New Year!   Here's to a fabulous 2018!  Take care, crafty friends!


Before you go, don't forget to leave a comment right here for a chance to win a gift card from winnie & walter!  You can leave comments on any/all of my December Leading Lady posts for a chance to win!


Saturday, December 23, 2017

Winnie & Walter Leading Lady - Take Four


 Hello, hello everyone! I'm excited to be back on the winnie & walter blog today -  Happy Christmas Eve-Eve (ha ha!).   I hope all of your holiday preparations are complete and you are able to sit back and enjoy the holidays....but if you are like me, you're still busy, cleaning the house, baking cookies, and.....you guessed it - creating gift tags!   Today I've got a few tags to share with you - and the best part is they were all quick and easy to make!


First up, I created a plaid background using the new Ticking Stripe Creative Screenings.  I sponged on Distress Ink in a dark shade and then rotated the stencil and inked again with a more vibrant shade.   I die cut the tags using Tagged: Holiday Cheer cutaways, and embellished with stamped and fussy cut holly and Dec. 25 images from Happy Christmas.


These next tags were stamped with the detailed tag image from Tagged: Holiday Cheer and die cut, again with the Tagged: Holiday Cheer cutaways.   I embellished these tags with Copic colored images from the super adorable Winter Wishes with Evelin T Designs, cut out with the coordinating cutaways.   They were adhered with foam tape and offset just a bit.  The sentiments are from the Tagged: Holiday Cheer stamp set.


Finally, I stamped several of the detailed circle tag images from Tagged: Holiday Cheer with Versamark ink and heat embossed with glitter embossing powder.   I die cut trees (from In a Word: Merry) from the center of each tag.   I used those trees on the next tag, popping them up with foam tape and adding a sentiment from Tagged: Holiday Cheer.

I hope these quick & easy tags have inspired you to create some last minute tags yourself!   And if not.....there's always next year, lol!!


Be sure to leave a comment below for a chance to win a gift card to w&w, generously provided by Shay! 

See you again next week for my final performance as December's Leading Lady! Happy Holidays! 


Thursday, December 21, 2017

Advent Calendar Extravaganza With Taheerah Atchia


Hello!!    I'm super excited to be part of Taheerah's Advent Calendar Extravaganza again this year - if you don't know what Advent Calendar Extravaganza is all about, read on to find out more!    If you're a seasoned "door clicker" (haha!!), scroll down to see my project!


Advent Calendar Extravaganza is -the- festive event of the season! This ‘hop with a twist’ was dreamed up by Taheerah Atchia and features surprise destinations each day! Joining in the fun with Taheerah are ONE HUNDRED special guests - each serving up some fantastic Christmas inspiration! Just like an Advent Calendar, you’ll never know where you’re going to be visiting next until you ‘open the door’!

And that’s not all! With 25 *amazing* sponsors taking part as guests as well, your crafty wish list is bound to get a boost with a chance to win a prize EVERY SINGLE DAY!!

Join in the fun every day at taheerah-atchia.com to see what special surprises await behind the door!

***********

Today's prize is generously provided by 'Lil Inker Designs, so for my card, I used one of 'Lil Inkers' awesome Cover Up Dies to create my own Christmas tree!   I cut a dark green triangle shape and ran it through my die cutting machine with the Dotted Scallops die.   It reminds me of garland!   I adhered another piece of lighter green paper behind it so the color shows through the holes.   Next I added some gems I found in my stash, a die cut star from Seasonal Stars and a hand cut tree trunk. 

I used the Dual Dotted Border Builder Dies from 'Lil Inker to create the pieces for my background, and adhered them to a piece of red cardstock stamped and heat embossed with a sentiment from the Big Christmas stamp set. 

I just love how festive this card turned out!   The bright colors and the shiny "ornaments" just make me smile!!  That's all for me - have fun checking out the rest of the Advent - wishing all of you a fantastic holiday season, from my home to yours! 


It’s not a party without a prize - and with prizes every day there are several chances to win! Today’s prize is generously supplied by 'Lil Inker Designs, so you’ll definitely want to win! Simply leave a comment on this post - then head back to taheerah-atchia.com and leave a comment there too! You must leave a comment on Taheerah’s blog as well as mine in order to be eligible to win! Don’t forget to grab the other surprise destinations from Taheerah’s blog and head over to them to leave comments there as well to improve your odds even more! You have until 23:59 EST on 31st December 2017 to enter.

Don’t forget Advent Calendar Extravaganza runs from 1st-25th December inclusive so make sure you visit taheerah-atchia.com every day for fabulous inspiration and amazing prizes every single time! Merry Christmas!

Sunday, December 17, 2017

Happy Chanukah Wishes


Hello friends!  Today I have a Chanukah card to share.   I have several friends who celebrate Chanukah, and it's awesome to have stamp sets in my stash so I'm able to create something tailored just for them!
Continuing on with my easy to mail holiday cards, this is another (nearly) one layer card.   I stamped the sentiment, from Chanukah, with an ombre of different blue shades of ink.   Since I was using my MISTI, I was able to stamp again with Versamark and heat emboss over top of the colors with clear embossing powder that I added just a touch of glitter to.   


The next step involved using an embossing diffuser, something I've had in my stash for ages, but have never used.   We all have items we've never got around to using, am I right?!   I placed the stamped piece in a snowflake embossing folder, then placed the oval embossing diffuser over the sentiment.   I love how it embossed the flakes just around the sentiment and not over top of it!

I sponged on a few shades of blue Distress Ink, and that finishes off today's card!  Thanks so much for stopping by!   Head over to CAS-ual Fridays if you want to check out the huge assortment of Chanukah/Hannukah stamps, as well as all of the other great goodies in the shop!   Use the special code KIMBERLY2017 to save 15%


Saturday, December 16, 2017

Winnie & Walter Leading Lady - Take Three


Hello there!   We are getting so close to the holidays - can you believe Christmas is right around the corner?!   I've got a few more holiday cards to share with all of you today - and the focus this time is on sequins, and how they can enhance just about any project!   Oh, how I love sequins....they are just as sparkly and less messy than glitter, lol!
First up, a shaker card of course!   I used the Essentials: Audrey Cutaways to create my shaker frame.   I filled it with a variety of sequins from Pretty Pink Posh, and before putting it all together, I stamped and heat embossed 'Be' from In a Word: Merry in gold. 


Once the shaker was adhered to my kraft card base, I added the remaining details - the scripty merry from In A Word: Merry Coordinating Cutaways cut from gold glitter paper, and the poinsettia, leaves and greenery from In Bloom: Debra's Poinsettia.   These were stamped on kraft paper (the poinsettia with white pigment ink and Gold Delicata ink for the details) and then die cut.  To add even more sparkle and shine, I added some tiny gold sequins to the center of the poinsettia!

Next up is a card using the gingerbread house from Sweet Holiday with Evelin T Designs. I had fun creating a scene for the gingerbread house - I added some hand cut snowy hills with a touch of Stickles glitter, and sponged on some Distress Ink behind where the gingerbread house would be placed.   I colored the house with Copic markers and added more Stickles for shine.   Small 4 mm. sequins are the perfect size to add embellishment to the roofline and a single black sequin serves as the doorknob!

That's all for me today - I hope you've been inspired to use sequins as accents on your cards!  Remember, I'm giving away a $30 w&w gift card here on my blog, so leave a comment on any (or all!) of my Leading Lady posts for a chance to win! 


Friday, December 15, 2017

A Blog Named Hero - Happy Holidays!

Hello friends!  I'm up at A Blog Named Hero with a card for our current challenge, Winter Holiday!   This month our collaboration partner is the fabulous Simon Says Stamp.  Head on over to get all the details, and be sure to link up to our challenge for a chance to win a prize from Simon Says Stamp!


Hero Arts Nesting POSTAGE STAMPS DIES DI345 Hero Arts Clear Stamps COLOR LAYERING SNOWY TREE CL997WOW Embossing Glitter PEARL GOLD SPARKLE REGULAR WS06R


PhotoPlay MAD 4 PLAID CHRISTMAS 6 x 6 Paper Pad MPC2877 Simon Says Clear Stamps HAPPY SSS101328

Saturday, December 9, 2017

Winnie & Walter Leading Lady - Take Two

Hello friends!  I'm so happy to be back with you again this fine Saturday on the Winnie & Walter blog!  Last week I mentioned that I'd be sharing cards that use NO STAMPING for this post.  That's right....ZERO stamps!   w&w has some seriously awesome dies, and I thought I'd challenge myself to leave the stamps on the shelf this time around!  Here's what I came up with!


I used the Essentials: Josephine Cutaways as the main focus of this card.   First I die cut and then I added some ink blending with Distress Oxide inks.   I adhered the frame piece to my card base and then rotated the main hexagon so that the colors appear opposite, and adhered it with foam tape.  

I die cut the In a Word: Believe Cutaway twice, once from silver glitter paper and once from white, and offset them.   


See those snowflakes?   Can you guess what I used to create them?  I used the Cover Model: Do You See What I See? Cutaway, and just cut apart some of the background.   I'm convinced there are about a million uses for this Cutaway!!!  As a matter of fact, I've used it again on my next card!  


I die cut the Cover Model: Do You See What I See? Cutaway from kraft paper, popped out some of the diamond pieces and adhered it to my card base.   I ran the cutaway through my die cutting machine once again using patterned paper, and added those pieces to the card base.  A few gems in the center add a little bling!  


For the sentiment, I used In a Word: Holiday Tiles Cutaways to die cut the Peace, Love, Joy sentiment from a strip of kraft cardstock.  I mounted it on a piece of matching red cardstock to finish things off!

I hope you've enjoyed today's cards - I think it's amazing what you can create without using any stamps!   Next week I'll be back (with stamps, of course!) sharing cards using sequins as accents!  See you next Saturday!  


Oh - don't forget to leave a comment here on my blog! Shay has generously provided a gift certificate for one lucky commenter!  You can comment on any (and all!) of my w&w Leading Lady posts this month for a chance to win.   I'll announce the winner on January 2! 


Wednesday, December 6, 2017

Christmas Holly Wreath

Hi friends!   I've got a fun card for you today that uses just one tiny stamp to get a whole different look!   Talk about bang for your buck when buying this stamp set!!
I began by lightly tracing a circle shape onto a piece of kraft paper.  I stamped the holly from Sleighride repeatedly around the circle with brown Copic friendly ink.  I added color with Copic markers and a highlight with a white gel pen.   


I die cut the Merry Christmas sentiment from the Noel Fri-Dies twice - once from red and once from white cardstock and then layered them together to make them pop!   To finish the card off, I trimmed down the kraft cardstock and adhered it to a red card base.   Voila!   Another nearly one layer card, easy to slip in the mail!   

Thanks so much for stopping by today!   Remember you can use my special code, KIMBERLY2017, on any purchase you make from the CAS-ual Fridays store - you'll save 15%!

See you again soon!


Monday, December 4, 2017

A Blog Named Hero December Challenge - Winter Holidays

 It's time for a new challenge at A Blog Named Hero!   This months theme is Winter Holidays and our fabulous collaboration partner is Simon Says Stamp!
 http://www.ablognamedhero.com/2017/12/challenge-winter-holiday-with-simon-says-stamp-part-one
The team was lucky enough to receive brand new dies from Simon Says Stamp's "DieCember" release - I received this super cute Happy HB die, and to make it work for the winter holiday theme, I went with soft shades of blue and snowflakes!


To create my card, I cut cardstock strips of several shades of blue and aqua and adhered them to my card front.  Next, I used the Hero Arts Festive Star & Bauble stencil for my background by adhering it over a piece of cardstock and pressing a Versamark pad over top.   I carefully lifted the stencil and added Sparkling Snow embossing powder from Wow!  


I die cut the sentiment from the center of the embossed panel - I love how the stripe detail shows through!  I trimmed the sides of the panel so the cardstock stripe background would show along the sides.

Since this is a card for someone with a winter birthday, I die cut a tag from one of last year's My Monthly Hero kits and tied it along the top with a piece of bakers twine.

Hope you're inspired to enter this month's challenge at A Blog Named Hero!   Can't wait to see what you create!


Saturday, December 2, 2017

Winnie & Walter Leading Lady!

Hello there!   I am so very excited to be w&w's Leading Lady for the month of December!   It's such a thrill to be guesting for one of my very favorite companies - many thanks and big hugs to Shay for inviting me to share with you this month!

So....it's December and everyone is probably expecting me to share some holiday cards - right?  Well, we will definitely get to that later in the month, but today I wanted to focus on how the latest w&w release full of holiday goodness can be used year round!   

First up, a super colorful birthday card using the Cover Model: Do You See What I See? Cutaway.  Can I just tell you how much I love this die!?!   You'll be seeing lots more of it this month!  


 I began by blending a rainbow of Distress Oxide inks onto a piece of bristol cardstock.   Next, I added some Stick It to the back of a black piece of cardstock and die cut the cutaway.   Adding the Stick It before die cutting will help immensely when adhering the cut to the ink blended background!  


I cut a rectangular piece of black cardstock as well as the In A Word: Happy cutaway.  I temporarily adhered the word die to the black cardstock to aid in placement of the stamping, which was heat embossed in white using In A Word Happy (the stamp set).   Once the stamping was done, I added some ink blending to the sentiment along with some Glossy Accents, and once dry, I offset it with another die cut and adhered it to the black panel!   

For my next card, I used the holiday set In Bloom: Victoria's Very Merry Flowers to create a card that could be used for just about any occasion!

   I used my MISTI stamping tool for stamp placement on this card - and the bonus is I only had to place each stamp once - I just rotated the panel and stamped again for a perfect mirror image on the top and bottom. The sentiment, from Wishing You, was stamped and heat embossed in brown, and a few purple Nuvo drops made the perfect berries!


 I'll see you again next Saturday with a few cards that use (gasp!) no stamping at all!    


Before you go - Shay has generously donated a gift certificate for me to give away.   I'll choose a winner from one of the comments left on any of my Leading Lady posts through the end of December.   The winner will be announced here on January 2!