Saturday, February 27, 2016

Gold + Watercolor

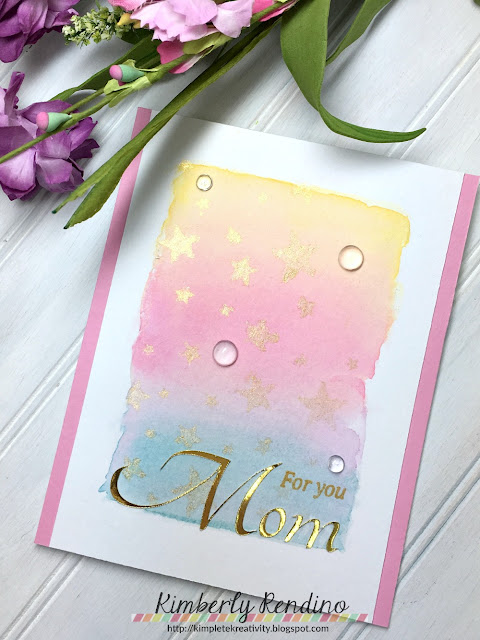
Hi crafty friends!  I hope you're enjoying your weekend!   I have another card today for one of Winnie & Walter's Belated 2nd Birthday challenges.   This time I'm playing along with Heather's Gold & Watercolor challenge, and let me tell you - this one was fun!   The picture just doesn't do it justice.
watercolor | handmade card | winnie & walter | kimpletekreativity.blogspot.com
I watercolored the background, keeping to a loose rectangular shape.   Once dry, I used the W&W Scenery - Big Bang Classic Star stencil to spritz some gold mist for a soft, golden look.    I used my Scan n Cut to cut the word Mom (from the Parentville cut files) from gold foil paper, sized just right to fit the watercolor wash background.   I stamped 'For You' from Parentville with Gold Delicata ink.   I finished the card by mounting it to a pink card base and adding some clear drops from Pretty Pink Posh!

It's nearing the end of the month, so if you want to play along with the fun challenges over at the Winnie & Walter blog, you have just a few more days!

Friday, February 26, 2016

You Are Fabulous!

Heart | Fabulous | handmade card | sequins | clear stamps | handmade | honey bee stamps | kimpletekreativity.blogspot.com
It's Friday, crafty friends, and that means I'm over on the Honey Bee Stamps blog - head over there for details on how I made this card!   

Wednesday, February 24, 2016

Happy Every Day Canvas

Hello, hello!   We've had nothing but rain all day today, so it was a great day to sit down and do some crafting!  When I went to CHA last month, I received a package of small canvases - I never paint, or do mixed media, although I admire it, and have wanted to get into it for a long time.  I guess I've been intimidated, lol!   But today I figured, hey, why not!?!   It's about time!
happy canvas | gelatos | bokeh |  faber castell | winnie & walter | kimpletekreativity.blogspot.com

I started by adding a layer of gesso.  Once that was dry, I smeared on some Faber-Castell gelatos and blended them with my finger.   I stamped the bokeh circles using the Winnie & Walter stamp set Scenery, Bigger Bang Confetti  and then stamped the 'Happy' from W&W's The Big, The Bold and the Happy  and 'Every Day' (I partially inked a sentiment to get just those two words) from The Party stamp set.   I thought it needed a little something more, so I spritzed the entire canvas with some Perfect Pearl mist and then used a white Faber-Castell Big Brush Marker to add some white highlights to my bokeh circles.   I really like how it turned out!  It's going to sit on a shelf in my craft room as a reminder to be happy, every day!  
happy canvas | gelatos | bokeh |  faber castell | winnie & walter | kimpletekreativity.blogspot.com

CHALLENGES

Winnie & Walter's 2nd Birthday Bash  (Anything But a Card category with Kate


Simon Says Stamp Monday challenge (Inspired by a Song - bet you can't guess which one, lol!!) 


Simon Says Stamp Wednesday challenge (Anything Goes)


Friday, February 19, 2016

You Warm My Heart!

penguin | Flakey Friends | handmade card | Honey Bee Stamps | Kimpletekreativity.blogspot.com
Hi friends!   I'm over at the Honey Bee blog with a card featuring the adorable penguin from the More Flakey Friends stamp set!    Be sure to head over there to see the full card!   Have a great weekend...

Saturday, February 13, 2016

Just Keep Swimming!

goldfish | layering stamp | hero arts | handmade card | handmade | kimpletekreativity.blogspot.com
Hi everyone!  I hope you're weekend is going well so far!    We are getting massively cold temperatures here in Central NY....last I checked it was -3 outside!    It's a night to order pizza and stay inside, for sure!

I received quite a few goodies in the mail this week, but one of the things I couldn't WAIT to ink up were these new layering goldfish from Hero Arts.   I love how they turned out - and they're so much fun to play with!   I will definitely be experimenting with different color combinations the next time I break out this set.

Stay warm, wherever you are, friends!

Friday, February 12, 2016

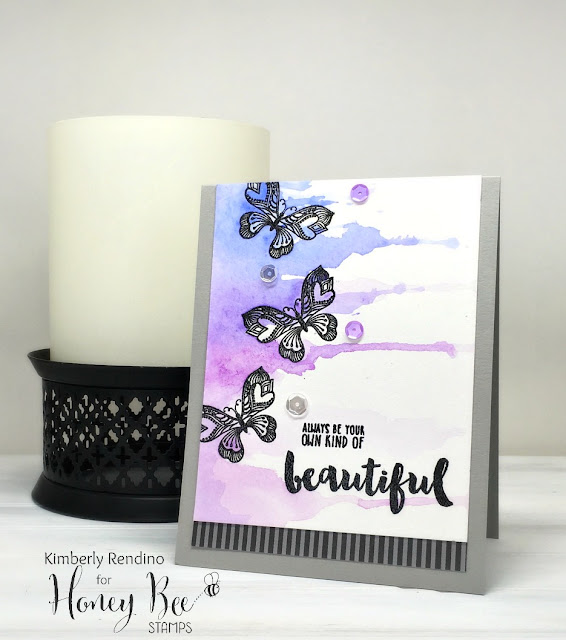
Always Be Your Own Kind of Beautiful

I'm up today on the Honey Bee Stamps blog today with a pretty watercolor card using my Zig Clean Color Real Brush Markers.

watercolor card | kimpletekreativity.blogspot.com | honey bee stamps | butterflies | handmade | handmade card

Check out the Honey Bee blog for more pictures and details of how I made this card!

CHALLENGES

One layer - embellishments are okay


Thursday, February 11, 2016

Watercolor Emboss Resist


I'm playing along with another Papertrey Ink 9th Anniversary challenge - for this one we had to grab and gather supplies in five minutes - and we had to use everything we gathered!  I took inspiration from one of Dawn's release cards, so I knew what I had to gather (is that cheating?  oops!)

doilies | handmade card | watercolor | papertrey ink | kimpletekreativity.blogspot.com
I stamped and heat embossed the doilies from the vault set Delightful Doilies in white on watercolor paper.   I added color with my Zig Clean Color Water Brush markers and heat embossed a sentiment from Winter Woods onto a strip of black cardstock.   I mounted the entire panel to a Raspberry Fizz top folding card base.   I had gathered the sequins, so I had to use them, but I'm not sure I'm in love with that look, lol!

Hope you've enjoyed my card!   See you again soon!

Newton's Nook February Release - Newton Unwinds

Welcome back for day two of the Newton's Nook Designs February release!   The new stamps will be available to purchase tomorrow! Today we are are sharing projects created with Newton Unwinds, the new stamp set & coordinating dies.   Newton fans, get ready.....this is an awesome new set featuring our favorite feline!
 cat | newton's nook designs | kimpletekreativity.blogspot.com | no line coloring | handmade card
I knew immediately I wanted to use Newton playing with the ball of yarn as if he were playing on the floor at home, so I set to work trying to recreate the scene!   I used patterned papers from Doodlebug and Avery Elle for the hardwood floor and wallpaper.   I added a strip of white with a tiny bit of grey shading to act as the baseboard.   Once I had the panel adhered together I ran it through my Vagabond with a stitched die for a little added interest.  
cat | newton's nook designs | kimpletekreativity.blogspot.com | no line coloring | handmade card
I used the no-line coloring technique again to color in Newton and his yarn with Copics.   I used the coordinating die to cut him out and then used my PenBlade to get inside the tiny spots.   You certainly wouldn't have to do that, but I like how it turned out!   After I added the sentiment I felt the card still needed something, so I die cut a stitched frame from the wood patterned paper and stamped and colored the flower pot from Garden Whimsy to create a little wall art!  


GIVEAWAY!

Would you like to win the “Newton Unwinds” Stamp Set?
This set will be given away to ONE lucky winner
Here's how to win: 
Comment on the NND blog and Design Team blogs (see list below)! The winner will be chosen at random from the collective blog release posts. Make sure to check out each of their blogs and comment for your chance to win. You will not know which blog has been chosen so the more you comment on the better your chances are of winning! You have until Thursday, February 11th at 9pm CST to comment  -- winners will be announced on the blog post on Friday, February 12th. 

Check out all the awesome Design Team Blogs below to enter:


Wednesday, February 10, 2016

Sampler Squares with Papertrey Ink


Hi everyone!   I'm playing along with Papertrey Ink's 9th Anniversary Celebration.   The challenge from yesterday really intrigued me - we were to create a "sampler" of sorts, featuring nine 1 1/2" squares, each altered differently, and then mounted on a 5.5 x 5.5" square card base.   Here's what I came up with!


sampler | handmade card | kimpletekreativity.blogspot.com | papertrey ink | hearts | love you | valentine
I used the medium heart from the Heart Prints die collection as my base, to keep a running theme throughout the card.  I altered it in many different ways - stamping on it, adding leaves (from the mini kit Garden Gild), cutting it from felt and adding a button, embossing, cutting it from vellum and sewing it up the center so it folds up, adding flowers & gems, etc.   The sentiment comes from the Tag-It's 11 stamp set.  

This was a fun challenge, and I love how it turned out!  

Thanks for stopping by!

Newton's Nook February Release - Made From Scratch!

 Welcome to day one of the Newton's Nook Designs February release!   Today the team is sharing creations made with the new Made From Scratch stamp set and coordinating dies!  This set is completely adorable, don't you think?!
shaker card | newton's nook designs | kimpletekreativity.blogspot.com | cupcake | sprinkles
To create my card, I began by stamping the mixer and spoon from Made From Scratch and the cupcake from Love a la Carte in a super light color ink.   I tried my hand at no-line coloring using Copic markers and I fell in love with the results!   I'll be doing this again, for sure!   I used the coordinating dies to cut out the spoon & mixer and fussy cut the cupcake.   I set these aside and started work on my shaker.   I used dies and "sprinkles" from PTI - they went perfectly with the adorable sentiment included in Made From Scratch!   I put everything together using patterned paper from Lawn Fawn.  I love how the die cuts look framing the shaker!   


GIVEAWAY!

Would you like to win the “Made from Scratch” Stamp Set?
This set will be given away to ONE lucky winner
Here's how to win: 
Comment on the NND blog and Design Team blogs (see list below)! The winner will be chosen at random from the collective blog release posts. Make sure to check out each of their blogs and comment for your chance to win. You will not know which blog has been chosen so the more you comment on the better your chances are of winning! You have until Thursday, February 11th at 9pm CST to comment  -- winners will be announced on the blog post on Friday, February 12th. 

Check out all the awesome Design Team Blogs below to enter:


Tuesday, February 9, 2016

Winnie & Walter 2nd Birthday Bash - Background Paper

I'm back with yet another card for Winnie & Walter's 2nd Birthday Bash Challenge.   This card is for the Create Your Own Background challenge with Gayatri.
layered flowers | winnie & walter | kimpletekreativity.blogspot.com | handmade card
I used stamps from the Bigger Bang Flurries & Big Bang Flurries stamp sets to create layered flowers.   I filled in the white space with extra tiny flowers.   I had the leftover negative from the 'Thanks' cut file I used on my card the other day sitting on my desk and it was the perfect bold greeting for this bright background!  

Check out the W&W 2nd Birthday Bash Challenge if you haven't done so already!   I'll be back tomorrow for the first day of Newton's Nook Designs' February release!   Be sure to stop back and check out the awesome new stamp sets that will be released this Friday!


Monday, February 8, 2016

Winnie & Walter 2nd Birthday Bash - Color Challenge!


I'm back today with another card for the Winnie & Walter 2nd Birthday Bash....this one uses the color challenge from Heather.   I stamped the Do You See What I See mini stamp in Versafine Black Onyx and heat embossed it with clear EP.   I used Copic markers in the colors of the challenge - aqua, coral & lime - and shaded heavily from the bottom right, and gradually going lighter as I reached the upper left.
gradient coloring | thank you card | winnie & walter | kimpletekreativity.blogspot.com | cubes

I spent quite a bit of time trying to get the coloring just right, so I kept the rest of the card simple.   I used the Thanks sentiment, die cut from from The Big, The Bold & You digital cut files, and adhered it at the bottom of my piece.   I added thin strips of black cardstock at the top and bottom of the card and that finished things off nicely!  

Hope you've enjoyed this card!  Be sure to check out the Winnie & Walter 2nd Birthday Bash blog post for details on how you can play along with all of the challenges as well!

Sunday, February 7, 2016

Winnie & Walter's 2nd Birthday Bash - Rainbow Challenge


Can you believe the weekend is almost over already!?   I had a chance to craft a few cards this weekend for Winnie & Walter's Belated 2nd B-day bash.  I started with Vanessa's rainbow challenge, because I can't resist rainbow colors!   

ombre stamping | winnie & walter | kimpletekreativity.blogspot.com
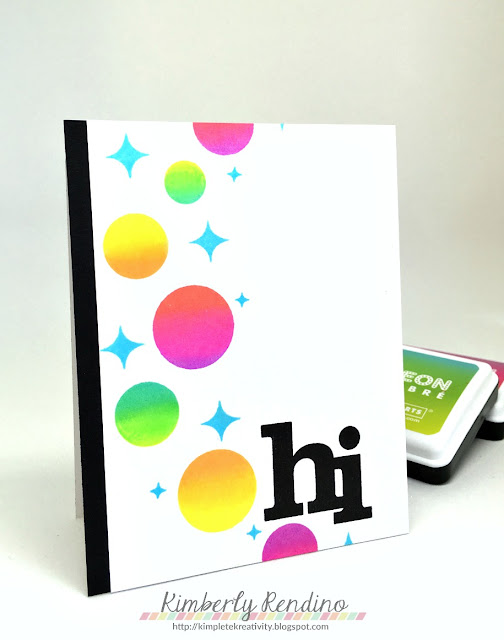
I got my hands on the new Hero Arts Neon Ombre inks and I couldn't wait to put them to use!   How awesome do those circles from Scenery: Bigger Bang Confetti look done in ombre?    I love it!   I used the tiny diamond from Scenery: Big Bang Confetti for this card as well.   I love that this card is basically one layer as well - the only dimension comes from layering the main panel on some black cardstock!   

I want to wish Winnie & Walter a very Happy Birthday - your stamps continue to be some of the go-to's in my craft room!  Keep up the great work, Shay!


Friday, February 5, 2016

Sweet Treats Blog Hop with Newton's Nook!

Welcome to the Newton's Nook Designs' Sweet Treats Blog Hop!   You should have arrived from the fabulous Nina-Marie's blog.   If you're just joining us or have lost your way, check out the link list below.
valentine gift | candy jar | handmade | tag |  newton's nook designs | kimpletekreativity.blogspot.com
I decided to make a jar full of Reese's hearts - pretty much my entire family's favorite candy!   Let's just see if this sticks around until Valentine's Day, lol!   

I began by creating a tag from a Tim Holtz die.   I wanted to create the look of a dimensional pattern, so I die cut several of the 'love' sentiment from the newly released Darling Hearts die set from glitter paper.   (Before I began, I added a layer of Stick-It - a super thin adhesive paper, to the back of the glitter paper.   This makes it super easy to adhere tricky die cuts like words!)  I also die cut several of the hearts from the same die set - I just positioned the hearts one inside of the other so that it would create an outline heart and a solid heart. I adhered the words and hearts, alternating and going off of my tag here and there to create a continuous look. 
valentine gift | candy jar | handmade | tag |  newton's nook designs | kimpletekreativity.blogspot.com

  To create the small tag, I die cut the circular tag from the Tags Times Two die using the same glitter paper.   I punched a white circle, slightly smaller than the tag and stamped the 'for you' sentiment from the Jolly Tags stamp set and adhered it to the glitter tag.   I used bakers twine to double layer my tags and tie them around the neck of the mason jar.   As a finishing touch I added some washi tape around the lid of the jar.  

Hope you are having a great time hopping along and gathering some awesome ideas for your own 'Sweet Treats'!   Your next stop is Yuki's blog - I'm sure she's got something special up her sleeve!

Giveaway!


Would you like to win a $10 store credit to our Newton's Nook Designs?
We are giving them out to
 TWO lucky winners

Here's how to win: 
Comment on the NND blog and Design Team blogs (see list below)! Two winners will be chosen at random from the collective blogs release posts. Make sure to check out each of their blogs and comment for your chance to win. You will not know which blog has been chosen so the more you comment on the better your chances are of winning! You have until Sunday, February 7th at 9pm CDT to comment  -- winners will be announced on the blog post on Monday, February 8th. 

Buzzing by.....

bumblebee | handmade card | honey bee stamps | kimpletekreativity.blogspot.com
I'm over at the Honey Bee Stamps blog today with a clean and simple card - head over there to check out how I made it!

Tuesday, February 2, 2016

There's Something Fishy About These Valentines....

guy valentine | fish | handmade card | kimpletekreativity.blogspot.com | newton's nook designs

Hi there, crafty friends!   Today I've got a pair of cute "manly" Valentines to share with you.   I used the Newton's Nook Designs stamp set Tranquil Tides to create these.   I started with a piece of Basic Grey patterned paper that I knew would work perfectly with this stamp set!   (Did you hear that Basic Grey is going out of the paper crafting business?   So sad!!)  I heat embossed the fish from Tranquil Tides and added some heart shaped bubbles with a Sakura Glaze Gel Pen.   I mounted the larger strip to a 4.25 x 5.5 card base and added thin black cardstock strips to the edges.   I stamped and heat embossed the adorable sentiment, added Distress Ink and a few flecks of water and then cut it down, rounded the edges and added a hole at the top to create a tag, which was attached to the card with some baker's twine.   I had extra patterned paper, and since I thought it was such a great match to the stamp set, I stamped some more fish and mounted the panel to black cardstock and then a top folding white card base.  

I think these are cute cards for anyone, but especially the guy in your life...sweet, but not glittery and pink, lol!  

Hope you've enjoyed my cards today.   Have a great week!