Friday, January 29, 2016
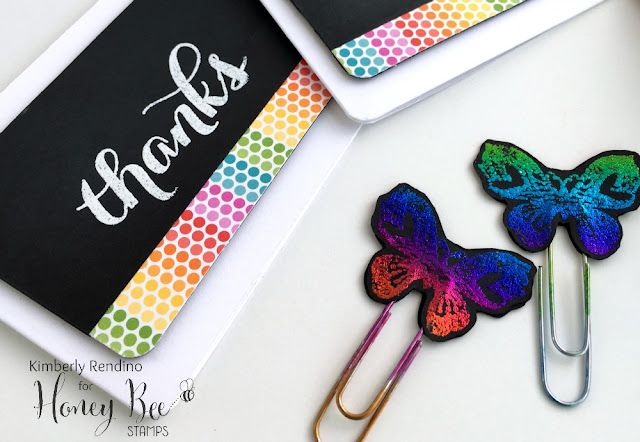
Rainbow Foiled Butterflies!
I'm over at the Honey Bee Stamps blog today with a cute set of thank-you cards with matching paperclips! Stop over there to check out how I made them!
Labels:
foiling,
Honey Bee Stamps
Tuesday, January 26, 2016
Dahlia Shaker Card
Hi crafty friends! Today I have a card using the absolutely gorgeous Fresh Cut Dahlias stamp set from The Ton. These layering stamps are so much fun to use! I stamped the dahlia using a variety of pink/peach colors. The leaves were stamped with inks from Altenew. The sentiment is from The Ton's Large Peony 1 stamp set. To assemble my card, I created a shaker using my Fuse tool. I inserted a piece of the script paper from PTI's Dearest Jane paper pad, and Sparkling Clear & Pink Peonies sequins in a variety of sizes from Pretty Pink Posh. The frame was die cut from brown cardstock using several Lawn Fawn stitched rectangle dies. Once I mounted the shaker to my cream card base, I adhered the sentiment strip, and arranged the dahlia and leaves as a corner accent.
CHALLENGES
I created this card to play along with the Muse Challenge using Jenni Murray's beautiful card as inspiration.
I'm also entering this card in the CAS-ology Challenge (Cue Card - Adore).
Labels:
Pretty Pink Posh,
shaker card,
The Ton
Friday, January 22, 2016
Guesting with the Coffee Loving Cardmakers!
**NOTE** This is my third post of the day. For my Newton's Nook Inky Paws Challenge post, click HERE
For my Honey Bee Stamps post, click HERE
Hi friends!! I'm super excited to be guesting with the Coffee Loving Cardmakers today! Check out the post over on their blog!
I love their awesome quarterly blog hops - I try to participate in all of them! If you stopped by to check out my blog, thanks a bunch! I'd love it if you subscribe, and you can also find me on Instagram!
I'll leave you with a few of my previous coffee cards....have a great weekend and thanks so much for stopping by!
Newton's Nook - Inky Paws #28 Love
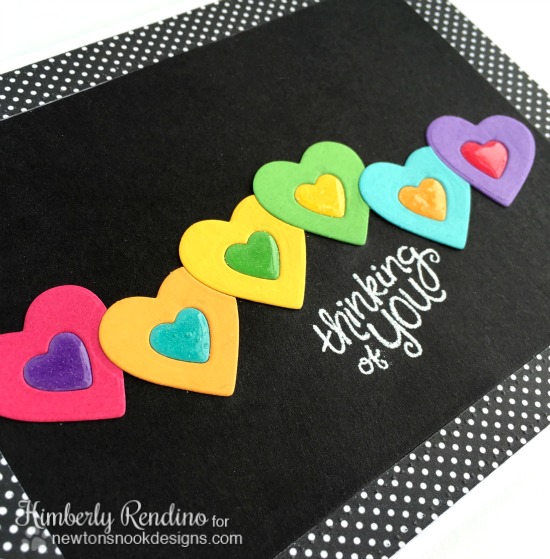
It's time for another Inky Paws Challenge with Newton's Nook Designs! The theme for this challenge is 'Love', and I was excited to showcase the new Darling Hearts die set! My card is nearly all die cut - the only stamping is the sentiment!
Instead of separating the two smallest heart dies when I received them, I left them together - this made lining everything up super easy! I started by die cutting my pink heart and for the second heart, I placed the die slightly on top of the pink heart and cut again with the orange, and then so on and so forth. When I was all done, I coated the smaller hearts with Glossy Accents, and glued them back inside the larger hearts in the opposite order. The heat embossed sentiment is from the Whispering Pines stamp set.
Instead of separating the two smallest heart dies when I received them, I left them together - this made lining everything up super easy! I started by die cutting my pink heart and for the second heart, I placed the die slightly on top of the pink heart and cut again with the orange, and then so on and so forth. When I was all done, I coated the smaller hearts with Glossy Accents, and glued them back inside the larger hearts in the opposite order. The heat embossed sentiment is from the Whispering Pines stamp set.
I hope you've enjoyed today's card! We'd love it if you played along with the challenge - I can't wait to see what you create!
All my Friends....
I'm over at the Honey Bee Stamps blog today sharing this cute card! Stop over there to check out how I made it! Have a good weekend, everyone!
Labels:
Honey Bee Stamps
Wednesday, January 20, 2016
Cardinal Valentine
Hi guys! Today I have a card to share that I just fell in love with. I wanted to play along with a few challenges, so I pulled out the Winnie & Walter sets Happiest of Holidays with Evelin T Designs and Scenery: The Party Hangover along with some sequins and set to work!
I began by stamping and embossing the sentiment (from W&W The Big, the Bold and the Happy) in the lower left corner of my focal panel. Next, I stamped the garland from Scenery: The Party Hangover, criss-crossing it here and there. I stamped the birdhouse and the bird on my panel, but I also stamped and fussy cut each element individually as well so that I could pop up the birdhouse with foam adhesive.
I colored everything in with Copics, and mounted the panel onto red cardstock and some woodgrain patterned paper from Doodlebug. A few Pretty Pink Posh sequins here and there along the garland finish the card!
I hope you've enjoyed my card! It's going to be a Valentine for my husband....I couldn't help but use the pink and sequins....lol! After all, it is for Valentine's Day!
CHALLENGES
Tuesday, January 19, 2016
Birthday Cards with Concord & 9th!
Hi crafty friends! I'm posting today while my kids are out playing in the approximately 18" of snow we've received over the last 24 hours. Today is a snow day....yay!
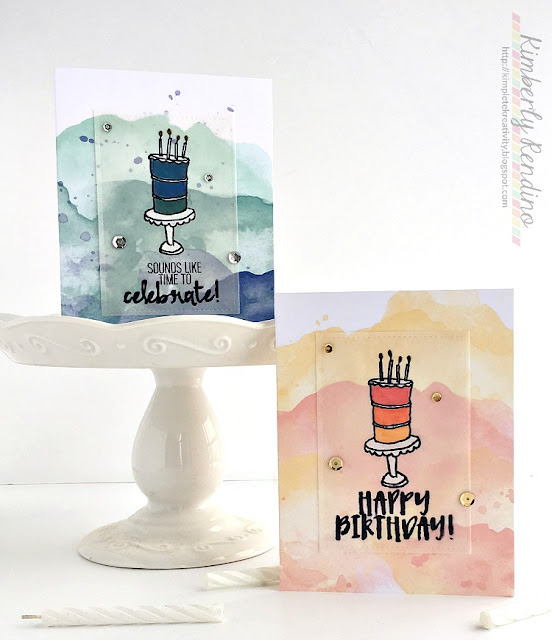
I wanted to play with some new Concord & 9th goodies I received last month. I absolutely adore the Happy Hues watercolor notecards, and they were my starting point. I stamped the birthday cake and sentiments from Eat Cake & Celebrate on vellum (die cut with a Lawn Fawn stitched rectangle die) using Staz-On ink. I colored the birthday cakes in on the back side of the vellum using a Faber-Castell white Big Brush Marker and Copics in graduating shades that matched the notecards. I absolutely love the opacity of the white Big Brush marker! I added some gold and silver sequins from Pretty Pink Posh and adhered the vellum to the note cards, hiding my adhesive behind the sentiments and sequins. I love how they turned out!
CHALLENGES
OMBRE
Sunday, January 17, 2016
Just for fun!
I was able to FINALLY break out my January Simon Says Stamp card kit last night and decided to play along with the SSS Wednesday challenge! I am pretty sure this is my favorite SSS card kit to date....those Doodlebug papers make me so happy! (Of course purple is my favorite color, so that helps!)
The SSS Wednesday challenge is ombre, so I broke out my Ombre ink pads from Hero Arts and stamped the adorable Simon Says Stamp snowflakes using the Pool to Navy and Lilac to Grape ink pads to create my own background paper.
I added a strip of some of the paper included in the kit as well as some of the silver sparkle tape. I heat embossed the 'sending flurries of' (also included in the stamp set) and the 'love' script is a new die from Newton's Nook Designs. I die cut it from both black and silver glitter paper and offset it - I love the look! The cute little eskimo girl sticker finished off the card! Isn't she adorable?!
I hope you're having a great weekend, everyone! I'll see you again soon!
Friday, January 15, 2016
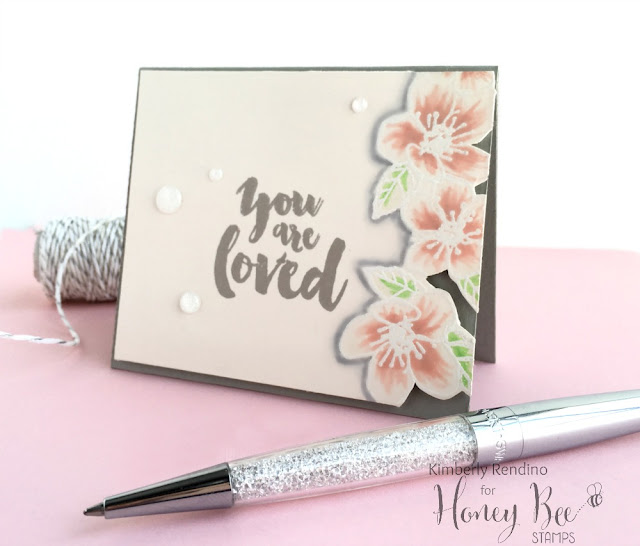
You Are Loved
I'm over at the Honey Bee Stamps blog today with this pretty floral card! Head over there to check out how I made it!
Thursday, January 14, 2016
Newton's Nook January Release - Darling Duos
Hello again! Today the Newton's Nook Designs team is showing off the awesome new "Darling Duos" stamp set and coordinating/stand-alone die set. Read on to find out how to win this stamp set!
There are a lot of cute images in this stamp set, but I couldn't wait to color in those birds! I started by using the large heart die to cut a heart in the center of a white piece of cardstock (I saved the resulting stitched heart for another use since I only needed the negative here). I embossed the piece with an embossing folder from WRMK. I placed the die cut piece of cardstock over a 4.25 x 5.5 card base and lightly traced with pencil inside the heart so that I knew where to stamp my image on the card base.
Once the birds were stamped, I erased my pencil line and colored the birds with Prismacolor pencils. I adhered the embossed piece to the card base with foam tape. The sentiment comes from two sets - Years of Cheers and Holiday Smooches. I like how colorful this card is, but yet the white on white gives it a little bit of an elegant feel!
Would you like to WIN “Darling Duos”?
This stamp set will be given away to ONE lucky winner!
Here's how to win:
Comment on the NND blog and Design Team blogs (see list below)! The winner will be chosen at random from the collective blog release posts. Make sure to check out each of their blogs and comment for your chance to win. You will not know which blog has been chosen so the more you comment on the better your chances are of winning! You have until Thursday, January 14th at 9pm CST to comment -- winners will be announced on the blog post on Friday, January 15th.
Check out all the awesome Design Team Blogs below to enter:
Wednesday, January 13, 2016
Newton's Nook Designs January Release - Hoppy Days!
Hello everyone! I'm back from CHA - what an amazing time! I'll share some pictures below. But today, I'm here to show you the brand new Hoppy Days stamp set from Newton's Nook Designs! This set will be available for sale on Friday in the NND store. Keep reading to find out how you can WIN this set for yourself!
How cute is that frog?! I colored him in with Copics and fussy cut him out. The little jump lines (what do you call those?!?!) were added by stamping in Versamark and embossing with clear EP. I adhered the frog with some dimensional adhesive. I cut some vellum with an edger die and adhered it to my solid color panel to represent water - I love how subtle it looks! I colored and fussy cut several of the lily pads as well, and adhered those on top of the vellum layer I love the sentiment! It was stamped in Versamark and embossed with white powder.
Would you like to win “Hoppy Days”?
This set will be given away to ONE lucky winner!
Here's how to win:
Comment on the NND blog and Design Team blogs (see list below)! The winner will be chosen at random from the collective blog release posts. Make sure to check out each of their blogs and comment for your chance to win. You will not know which blog has been chosen so the more you comment on the better your chances are of winning! You have until Thursday, January 14th at 9pm CST to comment -- winners will be announced on the blog post on Friday, January 15th.
Check out all the awesome Design Team Blogs below to enter:
OK! As promised, here are a few pictures from my CHA experience! To see more, follow me on Instagram HERE!
The Ranger booth - so much to see!
Me with Sandy Allnock! She was so nice!
Me with our fearless NND DT leader, Sam!
Yummy new Lawn Fawn ink colors & PAPER!
Doodlebug!!
So many talented ladies in this picture!
Be sure to stop back tomorrow for the next NND reveal!
Tuesday, January 5, 2016
Kitty Love
Hi everyone! I hope you all had an amazing holiday! It's time to switch gears in my card making.....Christmas is over so that means it's time to start creating for Valentine's Day! Today I have a cute card featuring Newton's Nook Designs!
I used the adorable kissing kitties from the Newton's Nook Christmas Cuddles stamp set. (It's out of stock at the moment, but you can sign up for the NND Newsletter to be notified when it's back!) I love that even though the holidays are over, this set is still getting use! I used Faber Castell Gelatos to create my background. I swiped various shades of red and pink onto watercolor paper and then blended with my finger and a damp baby wipe. I stamped a variety of hearts from different NND sets and heat embossed them over top of the blended background. I watercolored the kitties and die cut using the Christmas Cuddles dies. The sentiment is from the Simply Seasonal stamp set - 'Happy' was stamped on vellum and fussy cut and 'Valentine's Day' was white heat embossed on a black cardstock strip.
Hope you've enjoyed my card today! I'm off to CHA later this week. I'm so excited! I will be posting pictures/updates on my Instagram account. CLICK HERE to follow me so you don't miss a thing!
Subscribe to:
Posts (Atom)


